Availability
Lastly, the “Availability” based approach.
| Watch our YouTube video about Availability Based Scheduling at https://youtu.be/QkMukXOf_OQ (if this link is broken because we’ve posted a new version, go to our channel at https://www.youtube.com/SMMware to get to the new video) |
See the “Basic User” Manual for details on how associates enter their available/unavailable time.
A SMMware system can be configured for employees to describe when they can work based on their availability, or based on their unavailability, with all Associates using the same approach.
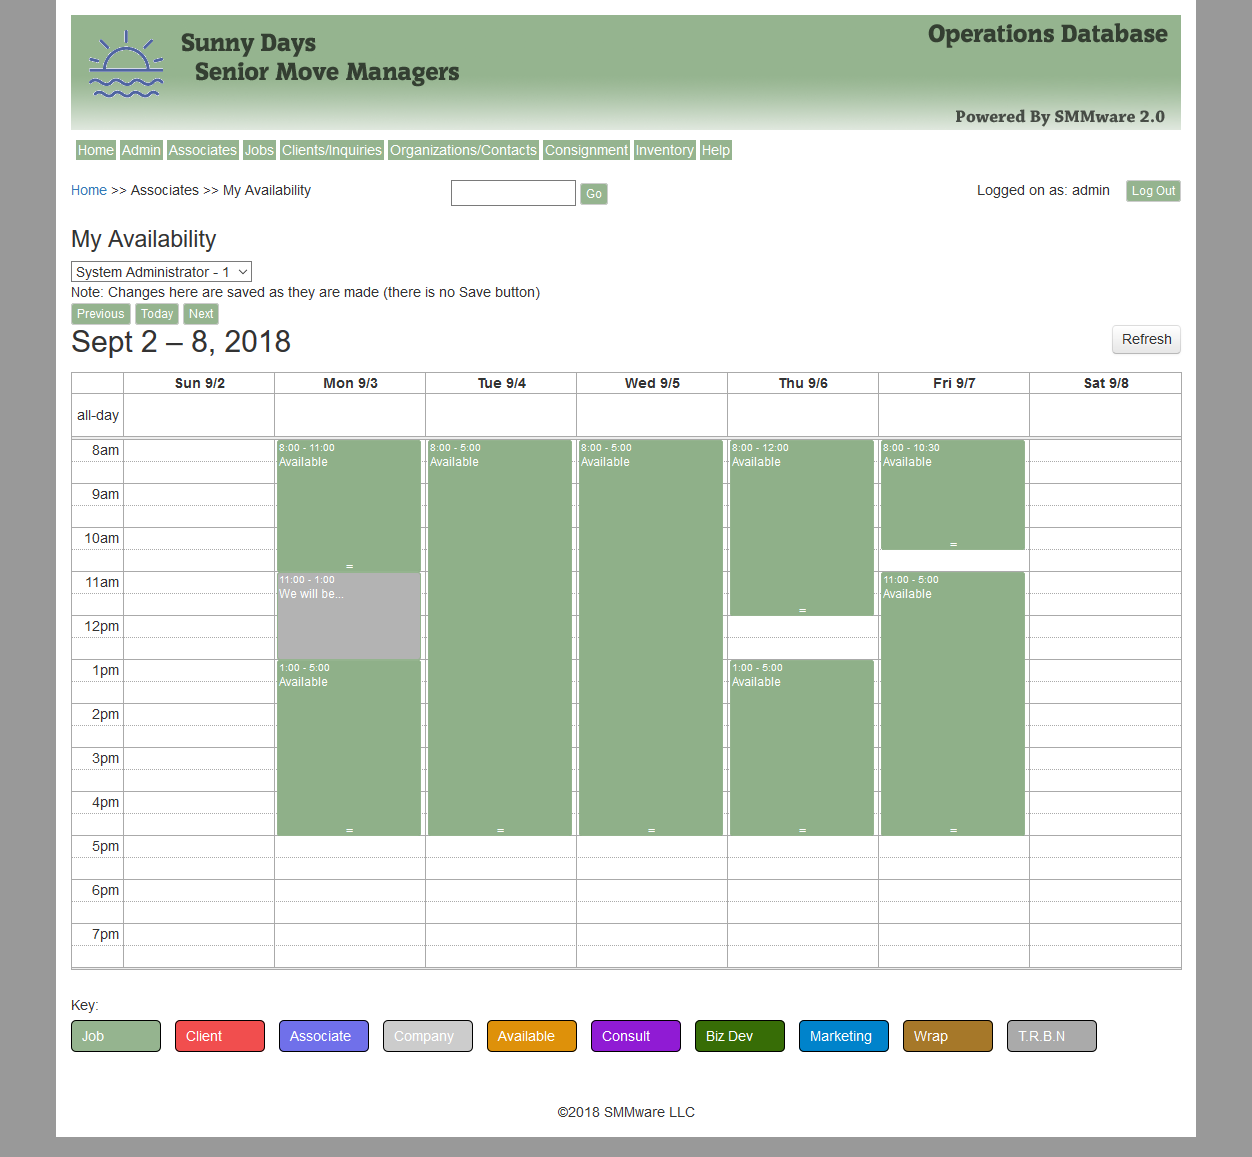
They browse to “Associates”->”My Availability” or “Associates”->”My Unavailability” and advance the calendar to the desired week. Lastly they click and drag to create entries. Below is a screenshot for My Availability. The green bars are ‘Available” entries. The grey box is an existing event this associate is part of. You can drag across multiple days, and SMMware will break the selection into individual days which can then be adjusted as usual.
To start, when editing an event change the “Attendee Management” dropdown to “Availability” (from either Direct or Invite). At that point, a single-day calendar will appear.
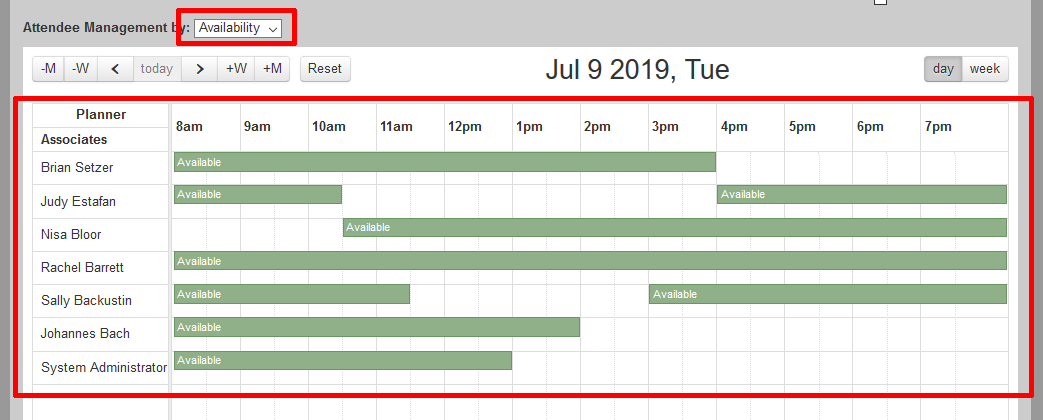
Start by navigating to the day you wish to select, using the navigation toolbar.

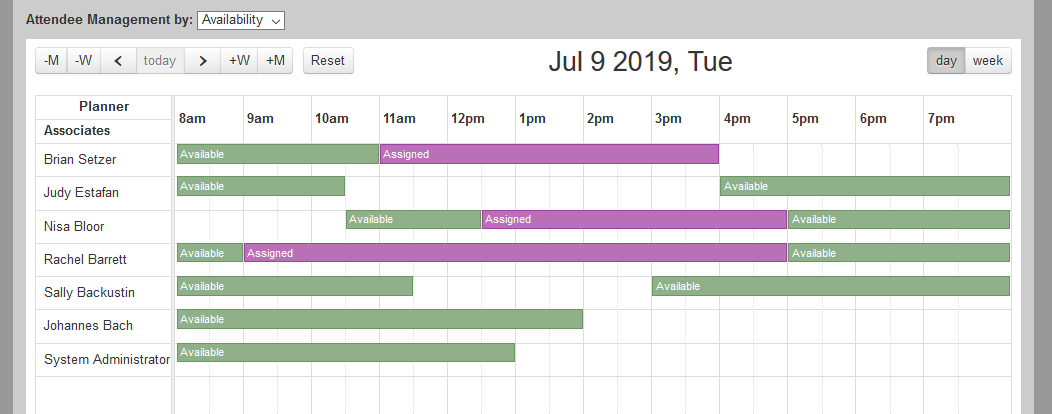
You begin by clicking on one of the ‘Available’ bars, which will turn red and have a label of ‘Shift’.

Next, you mouse over the left edge of the ‘Shift’ bar and grab and drag it to the appropriate starting time for that shift. Repeat for the end of the shift.
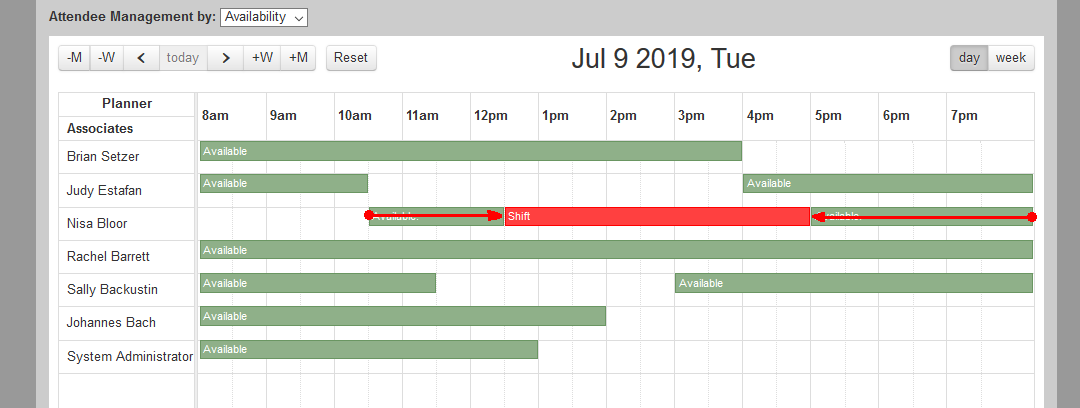
You can repeat for other Associates as needed, each with their own start and end times.
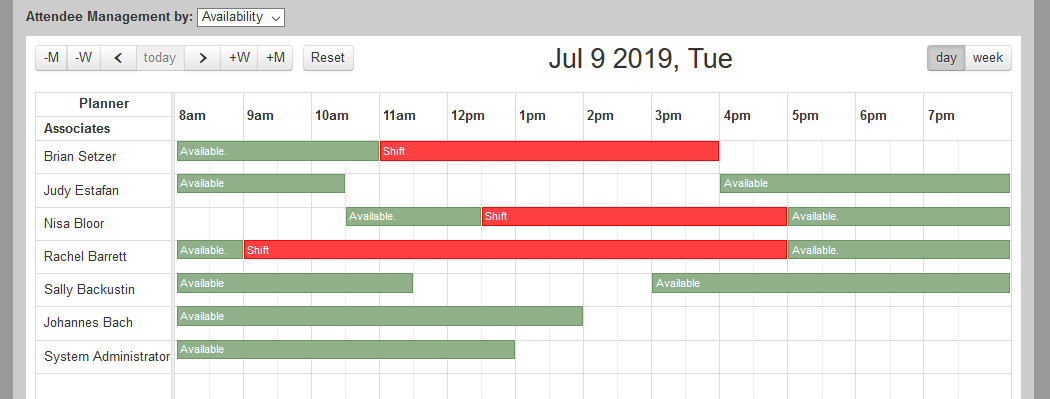
When all shifts have been assigned, click ‘Save’ and the screen will change to show the shifts as ‘Assigned’, the changes will be saved to the database, and emails will be sent out to the applicable associates.
The screen below shows the final calendar with three associates assigned.
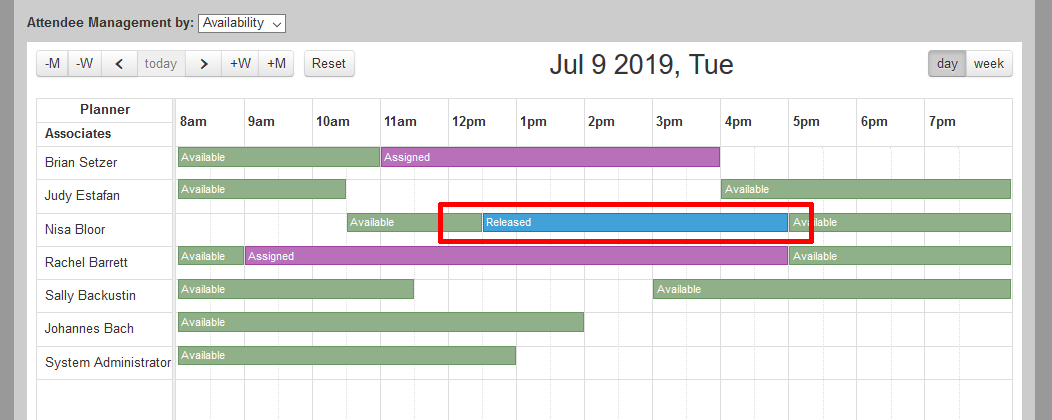
If an associate can no longer attend this event, click on “Assigned” and the label of the bar changes to say “Released”. This means that their time will not revert to “Available”, which makes sense since they are saying that they cannot work then (perhaps they are sick and going to the doctor). This is not permanent until you click “Save”.
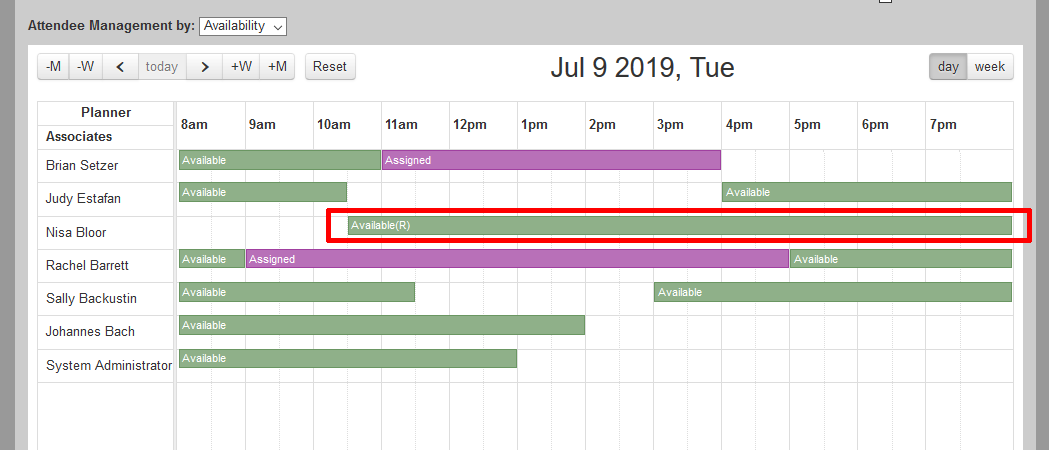
If you then click on “Released” again, it will revert to “Available”, and this chunk will be combined with any adjacent “Available” chunks. This is appropriate when the associate is removed because things change such that you don’t need as many people as you thought, and the associate is still available to work at other events.
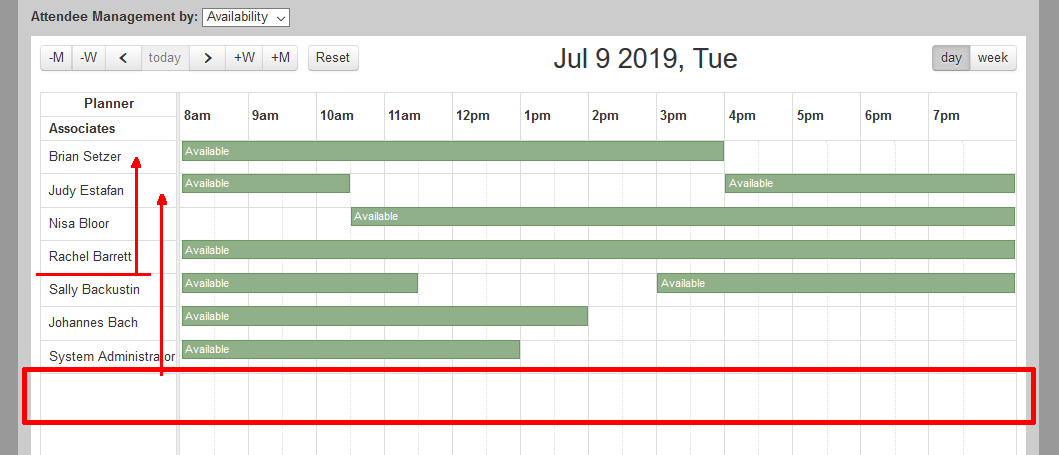
If you have ten or fifteen associates and the ones you are interested are scattered throughout the list, you can click on the name of an associate to move them to the top. In this way, you can gather the associates you want at the top, in a convenient visual summary.
An important consideration is travel time. When an associate says that they are available starting at 1pm, does that mean that they will walk out the door of your house at 1pm and can actually start work at 1:30pm (assuming ½ of travel), or does it mean that they are willing to walk out the door at 12:30 so as to start work at 1pm? Either approach can work as long as everyone company wide makes the same assumption.
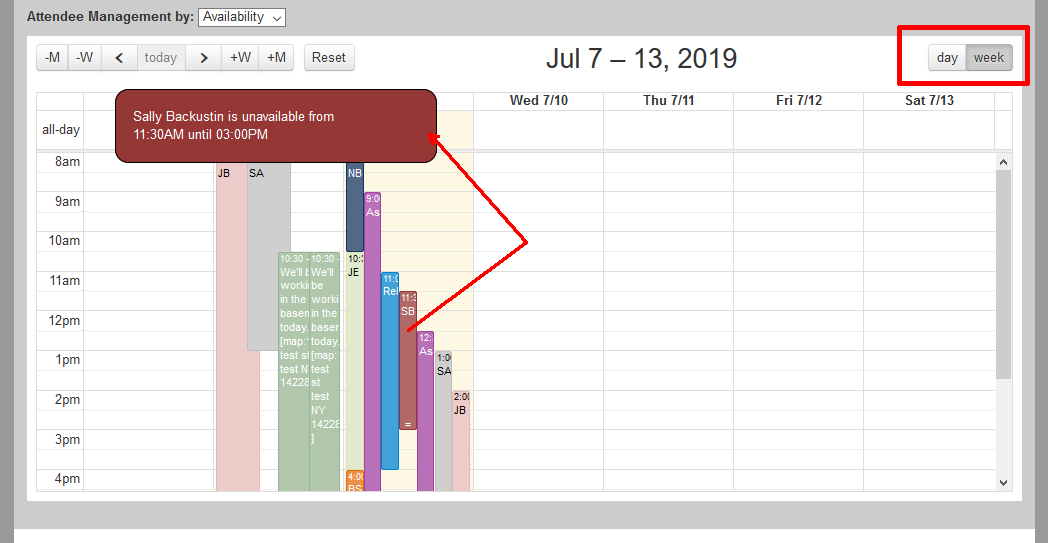
The calendar defaults to the ‘day’ view as seen through the images so far. But there is also a ‘week’ view which can be used to get a quick visual overview of who is available when. The colored bars have the initials of the relevant Associate. Clicking on any of the colored bars produces a popup with their full name and time range. Note that this view is not where you make assignments, you switch back to the ‘day’ view for that.
Calendar Colors
You are able to choose the color for a calendar event. A color picker is now in client profiles, job profiles, and event profiles, with 27 colors to choose from. The first option in the color picker (white, with the letter ‘D’ means ‘Default’ as in, “don’t override the default color”.
If you like to keep it simple: Just know that when you set the color from within an event profile (editing or adding an event from the Master Calendar), that color will be used for that event in the calendar.
If you are a Power User: There is a hierarchy that determines the color used in the calendars.
- By default, the color used by a calendar event comes from the event tag (job tag, inquiry tag, associate tag, client tag, company tag, etc.)
- Setting a color in a client profile overrides the default color from the event tag
- Setting a color in a job profile overrides a color set in the client profile.
- Setting a color in the event profile overrides everything else.
This system means that if you want all the events for a client to share the same color, you can set the color in one spot (the client profile) and all their events will share that color. Similarly, if you want all the events for a job to share the same color, you can set the color in one spot (the job profile).
Lastly, in the calendar popup for an event: If the event is tagged for a job, there is now a “Job Profile” hyperlink, and if the event is tagged for a client, there is a “Client Profile” hyperlink.