Associates
Instead of just “viewing” associates, an Admin User can add, edit, and delete them.
| Watch our YouTube video about the Associate Manager at https://youtu.be/5NxoFEawB3Y
|
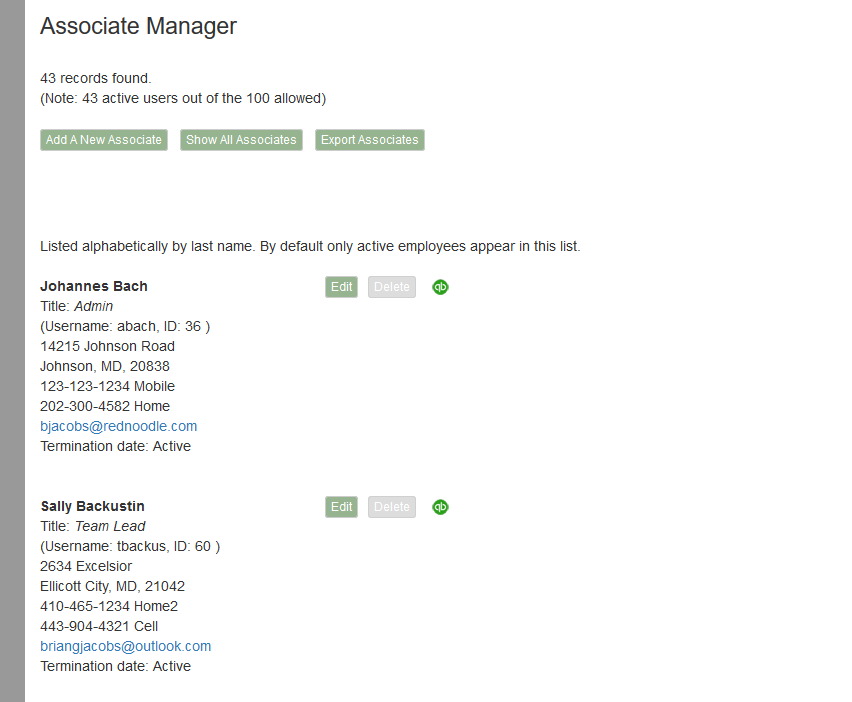
When you click on Edit for a given associate, you will be taken to a screen with fields where you can make changes.
The system keeps a history of the hourly rate and effective date. So as expected, work done prior to a raise is paid at the old rate, and work done afterwards at the new rate. This is true regardless of the date when the Payroll report is run.
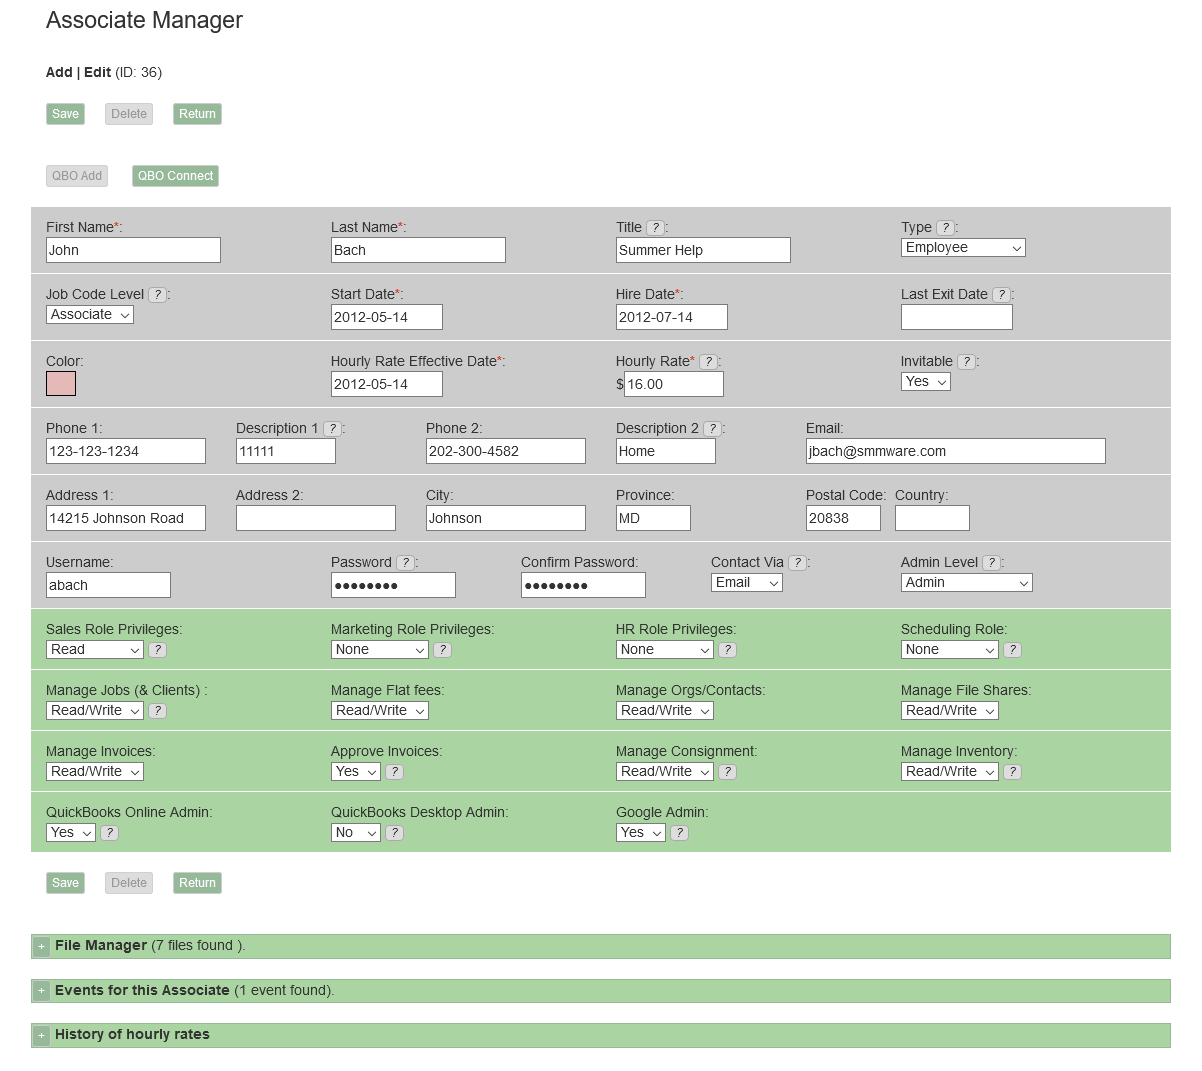
Title Field
The title field can be any value you like, and is not tied to any other part of SMMware in a concrete way.
Type Field
The type field is also not tied to any other part of SMMware, with the exception that if you choose type “Vehicle”, it affects charges to the client for travel. See the separate section about Vehicles.
Color
A color assigned to an associate has just one purpose. When editing an event and when using the “Availability” approach to attendee management, the colors are used for the ‘week’ view, so that you can easily tell which employee is available/unavailable. See the Scheduling section of the Team Lead Manual for more detail.
Job Code Level
When using job codes, there may be multiple sets of codes. A common scenario provides one set for Team Members, and another set for Team Leads. A given associate will get to choose from the set they are assigned to. There can be overlap between sets. If you are not using Job Codes, this setting will have no effect.
Invitable
The ‘Invitable’ dropdown affects scheduling. When a new event is created in scheduling, a list of Associates is presented for choosing attendees/invitees. Invitable must be set to “yes” for the Associate to appear in this list. Some Associates may not be involved in events (Ex: a Bookkeeper), and the purpose of this setting is that they should not receive unneeded emails.
Contact Via
The “Contact Via” setting is used for Scheduling, Tasks, and Calls. The Road Map of future development includes contact via texting, and this setting is in anticipation of that. The dropdown can be set to “Neither” to prevent any emails/texts being sent.
Last Exit Date
As would be intuitive, an associate cannot be deleted once they have made any hours/expense/mileage entries. When an associate is no longer be with the company, the appropriate action is to set a Last Exit Date in their profile. If they should return, just blank out the Last Exit Date to make them active again.
Only active associates can log in. Even if you don’t change their username/password, the fact that they have a Last Exit Date set will prevent logging in.
Admin Level
The options here are “Normal User”, “Team Lead”, “Admin”, “Senior Admin”, and “Company Owner”. This is a ‘master switch’, in that changing it also changes some of the individual settings described next. After you change this (and the individual ones get changed), you can still change those individual settings so as to ‘fine tune’ the associate’s permissions.
The Sales Role
If the Sales Role privileges are set to “None”, the Associate won’t have the “Sales Lead” item appear in their submenu under “Clients/Sales”. If this field is set to “Read/Write”, they will have the menu item and will be able to add/edit/delete Sales Leads.
Monitor Job Events
If an associate has ‘Sales Role Privileges’ set to at least ‘Read’, this dropdown appears directly below. By setting this to ‘Monitor Job Events’, a sales person can see events for jobs they sold on their homepage calendar without having formally be an attendee. This is useful for when a sales person likes to drop in at the worksite during an event to make the client feel that they are a priority for the sales person.
The Marketing Role
If the Marketing Role privileges are set to “None”, the Associate won’t have the “MailChimp Commands” menu item under the Admin menu. If set to “Read/Write”, they will.
The HR Role
This role affects whether the Associate can add and edit Associates. Having it also allows them to see the pay rate for a user, and allows them access to the Payroll Report.
It also allows them to see the File Manager section under an Associate profile. The normal user who has this field set to “None” will not see the File Manager even under their own profile. Typical use of this File Manager is to store performance reviews.
Normal users can “View” the profile for other Associates, but various sensitive fields will have asterisks in them (such as hourly rate and home address). They can see email address and phone numbers, allowing Associates to contact each other.
The Scheduling Role
If the Scheduling Role privileges are set to None, the Associate won’t have the Master Calendar item appear in the menu (found in either the Admin menu or the main menu), and won’t have access. Read access means they can view it, and Read/Write access means they can add/edit/delete events from the Master Calendar. All Associates can view their “My Schedule” section on the homepage, regardless of the setting for this field.
Various Permissions
The follow permissions are straightforward, affecting the areas described by their titles:
- Manage Jobs (& Clients)
- Manage Flat Fees
- Manager Organizations/Contacts
- Manage File Shares
- Manage Invoices
Approve Invoices
From within the Invoice Manager, this permission allows the user to directly set the approval level of an invoice. As a prerequisite, the user has to already have ‘Manage Invoices’ set to ‘Read/Write’, so as to have edit access to the invoice.
Manage Consignment
If the Consignment module is not enabled, this permission has no effect.
Manage Inventory
If the Inventory module is not enabled, this permission has no effect.
QuickBooks Online Admin
This permission only appears if the person editing the Associate Profile has their ‘Admin Level’ set to ‘Company Owner’. The thinking behind this restriction is that this permission is important, will only be assigned to a few people in any given company, and is not expected to change often.
If the QuickBooks Online integration is not enabled (in Section 1 of the Settings Editor), this setting has no effect.
QuickBooks Desktop Admin
This permission only appears if the person editing the Associate Profile has their ‘Admin Level’ set to ‘Company Owner’.
If the QuickBooks Desktop integration is not enabled (in Section 1 of the Settings Editor), this setting has no effect.
Google Admin
This permission only appears if the person editing the Associate Profile has their ‘Admin Level’ set to ‘Company Owner’.
This permissions allows the user to set up integration with the Google Calendar (see Section 4, Calendar, in the Settings Editor). This permission is unrelated to access to the SMMware Master Calendar, and unrelated to a user having access at Google to any given Google Calendar.
Zapier Admin
This permission only appears if the person editing the Associate Profile has their ‘Admin Level’ set to ‘Company Owner’.
This permission allows the user to set up the integration with Zapier.
Skill Codes
This is not a permission, but rather a ‘shorthand’ description of what a given employee is good at. This information appears when scheduling events, allowing you to pick the most suitable employee.
First, in the Settings Editor, Section 1, there is a text field where you can describe your approach to codes. For example, you might write: P=Painting, 1-5. C=carpentry, 1-5.
Then in an associate profile you could put P5, C2 to indicate that someone is very good at painting but not that good with carpentry.
Pay Levels
SMMware offers two approaches to paying associates:
- Per Associate Profile: This is the simpler approach and does not require as much configuration as using Job Codes does.
- Per Job Codes: This approach supports more complex situations, but does require more setup. It is tied to using Job Codes.
The approach to use for Associate pay can be selected on a job by job basis. So some jobs may pay according to ‘per Associate Profile while others pay ‘per Job Codes’. A reason why both might be in use is administrative done directly for the company that does not involve a client, where the pay scheme is probably simpler.
Since both can be in use, you might never use some of the settings that are visible, but nevertheless need to understand a little about them.
Per Associate Profile:
Pay ‘Per Associate Profiles’ handles four situations.
- As a Team Member, when the work day is a weekday
- As a Team Member, when the work day is a weekend
- As a Team Lead, when the work day is a weekday
- As a Team Lead, when the work day is a weekend
When ‘Per Associate Profile’ is used, the columns highlighted in red in the image below (from an Associate Profile) are relevant.
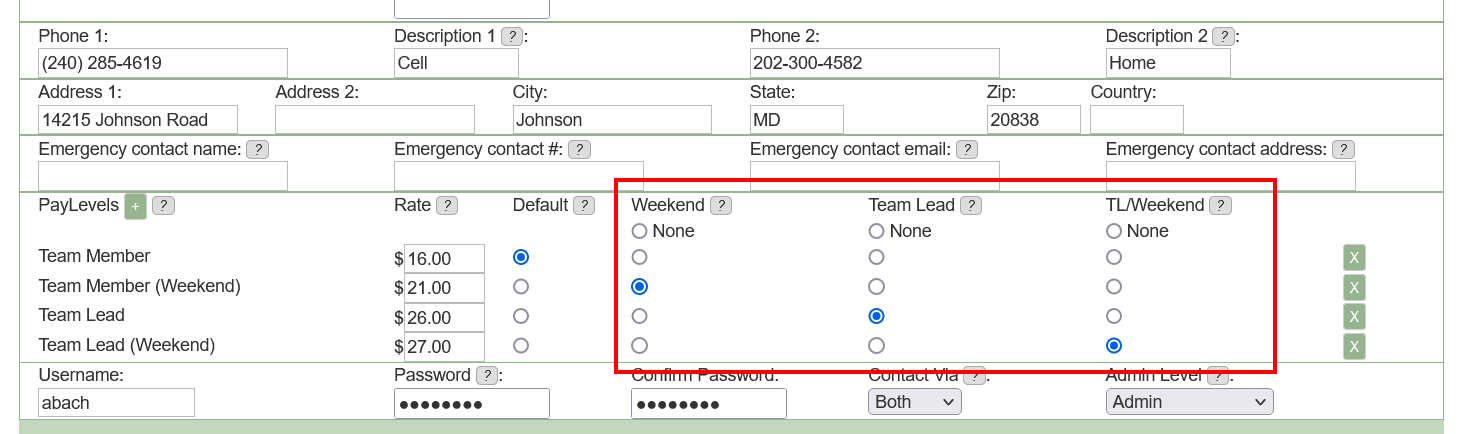
The rules are:
- SMMware will determine if the associate is acting as team lead or not.
- SMMware will determine if the work date fell on a weekday or weekend
- SMMware will use the ‘Weekend’, ‘Team Lead’, and ‘TL/Weekend’ columns of radio buttons to find a match.
- If SMMware cannot find a match, it will fall back to the default rate (as indicated by the ‘Default’ radio button).
Notes:
- The name of a pay level (whether Team Member, Team Lead, or other) is strictly for human consumption, SMMware does not assign any meaning to the name of a pay level. SMMware acts based on the radio button settings.
- The columns ‘Weekend’, ‘Team Lead’, and ‘TL/Weekend’ are tied to specific functionality. The names of these columns are the underlying criteria are not currently editable.
Pay ‘Per Job Codes’
When paying ‘per Job Codes’, associates choose a job code when entering hours.
For a job that pays ‘per Job Codes’, the first thing to understand is that the columns below (from an Associate Profile) outlined in red are not used at all.
Instead, in this case SMMware will understand which pay level to use based on settings seen when editing Job Codes (Admin->Settings, Section 6 Job Codes). See the red outlines in the image below. A Job Code can have two pay levels assigned to it, one for when the work date was on a weekday, and one if on the weekend.

The rules here are:
- SMMware will determine if the work date was on a weekday or weekend.
- SMMware will examine the chosen Job Code to find the name of the pay level assigned (weekday or weekend)
- SMMware will examine the associate profile to see if the name of the Pay Level found above is in the list of Pay Levels assigned to the Associate in question. Again, this is based on the name of the desired pay level. If yes, that pay level will be used. If not, SMMware will fall back to using the radio button selected in the ‘Default’ column.